Java ile RESTful webservice yazabilmek için kullanılabilecek araçlardan biri de Jersey. Bu yazının geri kalanında Java ile RESTful webservice yazma üzerine bir “hello world” sürecinin aşamaları anlatılacaktır. Platform olarak Java, IDE olarak Eclipse, management tool olarak Apache Maven, application server olarak Apache Tomcat ve REST için de Jersey kullanılmıştır.
Başlamadan önce:
- http://www.oracle.com/technetwork/java/javase/archive-139210.html
- http://eclipse.org/downloads
- http://maven.apache.org/download.cgi
- http://tomcat.apache.org/download-70.cgi
- https://jersey.java.net
JDK, Eclipse ile Maven kurulu ve çalışıyor halde olduğunu varsayarak devam ediyorum.
Eclipse üzerinde yeni bir Maven projesi oluşturarak başlayalım. File -> New -> Other -> Maven -> Maven Project yolunu izleyelim. Karşımıza aşağıdaki gibi bir ekran çıkmalı:

Sonraki adımda:
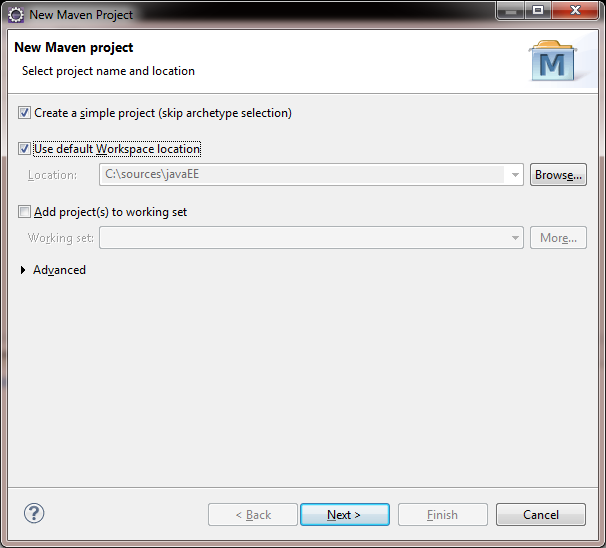
‘Create a simple project (skip archetype selection)’ checkbox’ını da seçip ilerliyoruz:

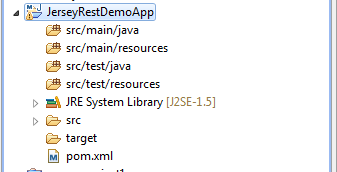
Group Id, Artifact Id, Version, Packaging, Name ve Description alanlarını örnek proje için yukarıdaki gibi doldurdum. ‘Finish’ butonunua tıkladıktan sonra projemiz oluşacak ve Eclipse Package Explorer’da görüntüsü şuna benzer olacaktır:
Şimdi sıra ‘Project facets’ kısmını düzenlemeye geldi. Proje üzerinde sağ tık -> Properties -> Project Facets yolunu izleyelim:

O sayfada görünen ‘Convert to faceted form..’ seçeneğine tıklayalım:

‘Dynamic Web Module (3.0) ve Java (1.7)’ seçeneklerini işaretleyelim. Java sisteminizde kurulu olan JDK sürümüne göre farklılık gösterebilir. ‘Dynamic Web Module’ seçildiğinde pencerenin alt kısmında ‘Further configuration available…’ şeklinde bir bilgi notification’u belirecek. Onu da seçelim:
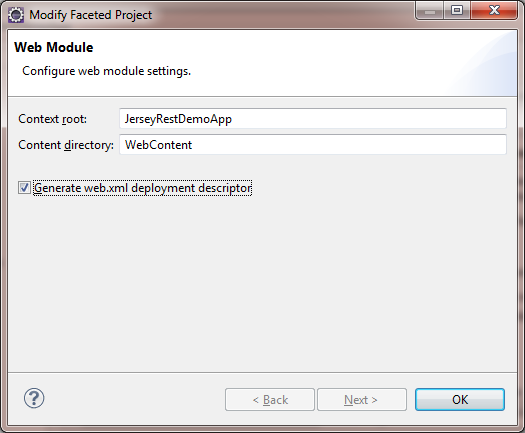
Açılan yeni pencerede ‘Generate web.xml deployment descriptor’ seçeneğini de işaretleyip devam edelim. Böylelikle ‘WebContent’ altında ‘META-INF ve WEB-INF’ klasörleri ile ‘web.xml’ dosyasını da projeye eklemiş olduk (Aslında her işi Eclipse yapıyor :) ). Projenin Eclipse Package Explorer’daki yeni görüntüsü şimdi şuna benzer olmalı:

Proje bu haliyle iken ‘pom.xml’ dosyamıza bir göz atalım:
<project xmlns="http://maven.apache.org/POM/4.0.0" xmlns:xsi="http://www.w3.org/2001/XMLSchema-instance"
	xsi:schemaLocation="http://maven.apache.org/POM/4.0.0 http://maven.apache.org/xsd/maven-4.0.0.xsd">
	<modelVersion>4.0.0</modelVersion>
	<groupId>tr.com.oguzo.rest</groupId>
	<artifactId>JerseyRestDemoApp</artifactId>
	<version>0.0.1-SNAPSHOT</version>
	<name>JerseyRestDemoApp</name>
	<description>JerseyRestDemo Project</description>
</project>
Default J2SE-1.5 olarak görünen ‘JRE System Library’ değerini güncelleyip 1.7’ye çekmek, gerekli Mavem pluginlerini eklemek ve projenin kullanacağı bağımlılıkları (dependency) eklemek için ‘pom.xml’ dosyamızı güncelleyelim:
<project xmlns="http://maven.apache.org/POM/4.0.0" xmlns:xsi="http://www.w3.org/2001/XMLSchema-instance"
	xsi:schemaLocation="http://maven.apache.org/POM/4.0.0 http://maven.apache.org/xsd/maven-4.0.0.xsd">
	<modelVersion>4.0.0</modelVersion>
	<groupId>tr.com.oguzo.rest</groupId>
	<artifactId>JerseyRestDemoApp</artifactId>
	<version>0.0.1-SNAPSHOT</version>
	<name>JerseyRestDemoApp</name>
	<description>JerseyRestDemo Project</description>

	<packaging>war</packaging>

	<properties>
		<java.version>1.7</java.version>
		<jersey.version>2.7</jersey.version>
		<maven.compiler.plugin.version>3.1</maven.compiler.plugin.version>
		<maven.war.plugin.version>2.4</maven.war.plugin.version>
	</properties>

	<dependencies>
		<dependency>
			<groupId>org.glassfish.jersey.containers</groupId>
			<artifactId>jersey-container-servlet</artifactId>
			<version>${jersey.version}</version>
		</dependency>
	</dependencies>

	<build>
		<finalName>JerseyRestDemoApp</finalName>
		<plugins>
			<plugin>
				<groupId>org.apache.maven.plugins</groupId>
				<artifactId>maven-compiler-plugin</artifactId>
				<version>${maven.compiler.plugin.version}</version>
				<configuration>
					<source>${java.version}</source>
					<target>${java.version}</target>
				</configuration>
			</plugin>
			<plugin>
				<groupId>org.apache.maven.plugins</groupId>
				<artifactId>maven-war-plugin</artifactId>
				<version>${maven.war.plugin.version}</version>
				<configuration>
					<warSourceDirectory>WebContent</warSourceDirectory>
				</configuration>
			</plugin>
		</plugins>
	</build>
</project>
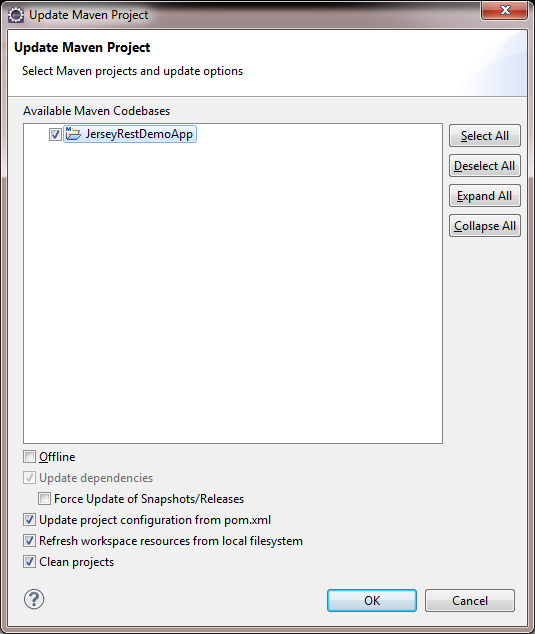
Bu işlem sonrasında Eclipse kızacaktır. IDE’mizi fazla sinirlendirmeden proje üzerinde sağ tık -> Maven -> Update Project yolu ya da ‘Alt + F5’ kısayolu ile ‘pom.xml’ dosyamızı güncellediğimizi haber verelim.

Karşımıza çıkan ekranda projeyi seçip devam edelim:
Artık iskeletimiz hazır. Yavaş yavaş organları eklemeye başlayalım. Öncelikle projeye yeni bir package ekleyelim:

Şimdi de var olan package içine bir class ekleyerek devam edelim:

Hala tüm işi Eclipse yapıyor :) Bizim için oluşturduğu class’a bir göz atalım:
package tr.com.oguzo.rest;

/**
 * @author Oguz
 * @since 2014.5.1
 *
 */
public class HelloREST {

}
Şimdi bu class’ı biraz değiştirelim ve GET isteklerini karşılayacak basit bir metod ekleyelim:
package tr.com.oguzo.rest;

import javax.ws.rs.DefaultValue;
import javax.ws.rs.GET;
import javax.ws.rs.Path;
import javax.ws.rs.PathParam;
import javax.ws.rs.QueryParam;
import javax.ws.rs.core.Response;

/**
 * @author Oguz
 * @since 2014.5.1
 *
 */

@Path("/helloREST")
public class HelloREST {
	@GET
	@Path("/{param}")
	public Response responseMessage(@PathParam("param") String param,
			@DefaultValue("Nothin' to say") @QueryParam("value") String value) {
		String output = "Greetings from " + param + " : " + value;

		return Response.status(200).entity(output).build();
	}
}
Eclipse’in bizim için oluşturduğu ‘web.xml’ dosyasını da biraz değiştirmemiz gerekecek. Başlangıç hali böyle olan dosyayı:
<?xml version="1.0" encoding="UTF-8"?>
<web-app xmlns:xsi="http://www.w3.org/2001/XMLSchema-instance"
	xmlns="http://java.sun.com/xml/ns/javaee"
	xsi:schemaLocation="http://java.sun.com/xml/ns/javaee http://java.sun.com/xml/ns/javaee/web-app_3_0.xsd"
	id="WebApp_ID" version="3.0">
	<display-name>JerseyRestDemoApp</display-name>
	<welcome-file-list>
		<welcome-file>index.html</welcome-file>
		<welcome-file>index.htm</welcome-file>
		<welcome-file>index.jsp</welcome-file>
		<welcome-file>default.html</welcome-file>
		<welcome-file>default.htm</welcome-file>
		<welcome-file>default.jsp</welcome-file>
	</welcome-file-list>
</web-app>
şu şekilde değiştirelim:
<?xml version="1.0" encoding="UTF-8"?>
<web-app xmlns:xsi="http://www.w3.org/2001/XMLSchema-instance"
	xmlns="http://java.sun.com/xml/ns/javaee"
	xsi:schemaLocation="http://java.sun.com/xml/ns/javaee http://java.sun.com/xml/ns/javaee/web-app_3_0.xsd"
	id="WebApp_ID" version="3.0">
	<display-name>JerseyRestDemoApp</display-name>

	<servlet>
		<servlet-name>JerseyRestDemo Application</servlet-name>
		<servlet-class>org.glassfish.jersey.servlet.ServletContainer</servlet-class>
		<init-param>
			<param-name>jersey.config.server.provider.packages</param-name>
			<param-value>tr.com.oguzo.rest</param-value>
		</init-param>
		<init-param>
			<param-name>com.sun.jersey.api.json.POJOMappingFeature</param-name>
			<param-value>true</param-value>
		</init-param>
		<load-on-startup>1</load-on-startup>
	</servlet>

	<servlet-mapping>
		<servlet-name>JerseyRestDemo Application</servlet-name>
		<url-pattern>/rest/*</url-pattern>
	</servlet-mapping>
</web-app>
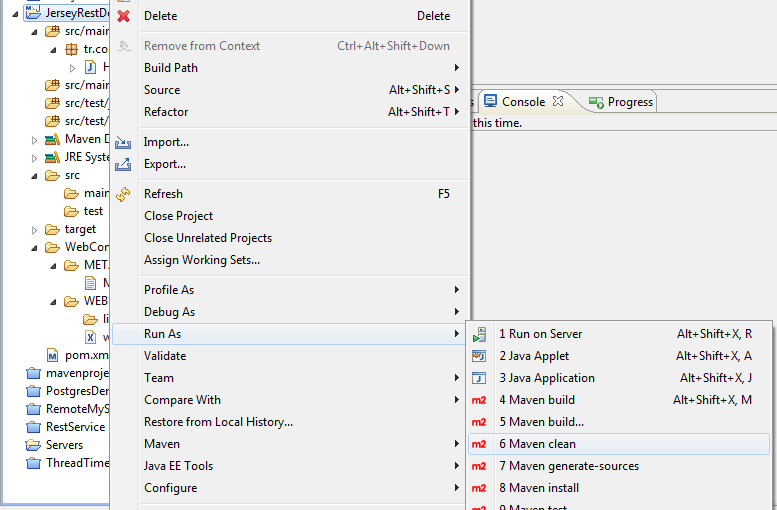
Servlet tanımlamasını ve mapping işlemini de böylece tamamlamış olduk. Şimdi maven clean & install işlemlerini yapalım. Kara ekranları pek sevmiyorsanız Eclipse ona da çözüm getirmiş :) Proje üzerinde sağ tık -> Run As -> Maven clean sırasıyla gidelim:
Bu işlem sonucunda aşağıdakine benzer bir console çıktısı elde ediyorsak doğru yoldayız demektir:
[INFO] Scanning for projects...
[INFO]
[INFO] ------------------------------------------------------------------------
[INFO] Building JerseyRestDemoApp 0.0.1-SNAPSHOT
[INFO] ------------------------------------------------------------------------
[INFO]
[INFO] --- maven-clean-plugin:2.4.1:clean (default-clean) @ JerseyRestDemoApp ---
[INFO] Deleting C:\sources\javaEE\JerseyRestDemoApp\target
[INFO] ------------------------------------------------------------------------
[INFO] BUILD SUCCESS
[INFO] ------------------------------------------------------------------------
[INFO] Total time: 0.438s
[INFO] Finished at: Thu May 01 16:19:43 EEST 2014
[INFO] Final Memory: 4M/122M
[INFO] ------------------------------------------------------------------------
Eğer ‘BUILD SUCCESS’ yerine ‘BUILD FAILURE’ görüyorsak hata mesajlarından gidip eksikleri tamamlamamız gerekiyor. Başarılı ise yola devam edelim. Sağ tık -> Run As -> Maven install ile projeyi build edelim. Bende aşağıdaki gibi bir çıktı oluştu, eğer Jersey ve onun bağımlılığı olan diğer kütüphaneler daha önce local repository’de bulunmuyorsa Maven önce onları indirip, işine sonra devam edecek. Bu da işin biraz daha uzun sürmesi ve console’da daha fazla log satırı görüyor olmak demek.
[INFO] Scanning for projects...
[INFO]
[INFO] ------------------------------------------------------------------------
[INFO] Building JerseyRestDemoApp 0.0.1-SNAPSHOT
[INFO] ------------------------------------------------------------------------
[INFO]
[INFO] --- maven-resources-plugin:2.5:resources (default-resources) @ JerseyRestDemoApp ---
[debug] execute contextualize
[WARNING] Using platform encoding (UTF-8 actually) to copy filtered resources, i.e. build is platform dependent!
[INFO] Copying 0 resource
[INFO]
[INFO] --- maven-compiler-plugin:3.1:compile (default-compile) @ JerseyRestDemoApp ---
[INFO] Nothing to compile - all classes are up to date
[INFO]
[INFO] --- maven-resources-plugin:2.5:testResources (default-testResources) @ JerseyRestDemoApp ---
[debug] execute contextualize
[WARNING] Using platform encoding (UTF-8 actually) to copy filtered resources, i.e. build is platform dependent!
[INFO] Copying 0 resource
[INFO]
[INFO] --- maven-compiler-plugin:3.1:testCompile (default-testCompile) @ JerseyRestDemoApp ---
[INFO] Nothing to compile - all classes are up to date
[INFO]
[INFO] --- maven-surefire-plugin:2.10:test (default-test) @ JerseyRestDemoApp ---
[INFO] Surefire report directory: C:\sources\javaEE\JerseyRestDemoApp\target\surefire-reports

-------------------------------------------------------
 T E S T S
-------------------------------------------------------

Results :

Tests run: 0, Failures: 0, Errors: 0, Skipped: 0

[INFO]
[INFO] --- maven-war-plugin:2.4:war (default-war) @ JerseyRestDemoApp ---
[INFO] Packaging webapp
[INFO] Assembling webapp [JerseyRestDemoApp] in [C:\sources\javaEE\JerseyRestDemoApp\target\JerseyRestDemoApp]
[INFO] Processing war project
[INFO] Copying webapp resources [C:\sources\javaEE\JerseyRestDemoApp\WebContent]
[INFO] Webapp assembled in [89 msecs]
[INFO] Building war: C:\sources\javaEE\JerseyRestDemoApp\target\JerseyRestDemoApp.war
[INFO]
[INFO] --- maven-install-plugin:2.3.1:install (default-install) @ JerseyRestDemoApp ---
[INFO] Installing C:\sources\javaEE\JerseyRestDemoApp\target\JerseyRestDemoApp.war to C:\Users\Oguz\.m2\repository\tr\com\oguzo\rest\JerseyRestDemoApp\0.0.1-SNAPSHOT\JerseyRestDemoApp-0.0.1-SNAPSHOT.war
[INFO] Installing C:\sources\javaEE\JerseyRestDemoApp\pom.xml to C:\Users\Oguz\.m2\repository\tr\com\oguzo\rest\JerseyRestDemoApp\0.0.1-SNAPSHOT\JerseyRestDemoApp-0.0.1-SNAPSHOT.pom
[INFO] ------------------------------------------------------------------------
[INFO] BUILD SUCCESS
[INFO] ------------------------------------------------------------------------
[INFO] Total time: 3.580s
[INFO] Finished at: Thu May 01 16:22:08 EEST 2014
[INFO] Final Memory: 11M/223M
[INFO] ------------------------------------------------------------------------
Bu demo uygulamada Unit Test yazmadığımız için test çalışan test sayısı 0 görünüyor. Bu arada ‘Maven Build Lifecycle’a göz atmak isterseniz:
- https://maven.apache.org/guides/introduction/introduction-to-the-lifecycle.html
- http://maven.apache.org/ref/3.2.1/maven-core/lifecycles.html
Maven install işlemi de başarı ile tamamlandıysa artık projeyi deploy edebiliriz. Bunun için target klasörü altında oluşan .war dosyasını kullanabiliriz. O kısmı ayrı bir blog yazısı ile anlatabilirim. Bu yazıda direkt IDE üzerinden local’de çalışmak ve debug yapabilmek adına Eclipse üzerinden projeyi Apache Tomcat’e deploy etme işlemi ile devam edelim.
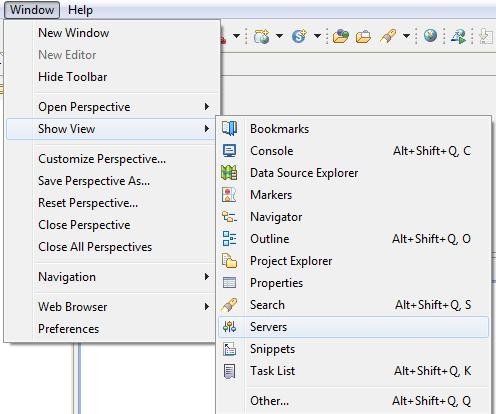
Eclipse menülerinden Window -> Show View -> Servers seçilerek Servers penceresinin görünür olduğundan emin olalım:
Daha önceden Eclipse ile tanıştırılmış bir server olmadığını varsayarsak aşağıdaki gibi bir ekranımız olmalı:
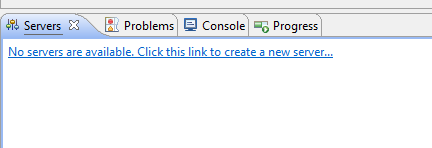
‘No servers are available. Click this link to create a new server…’ linkine tıklayıp yeni bir server tanımlayalım. Bizi şöyle bir ekranın karşılaması gerekiyor:

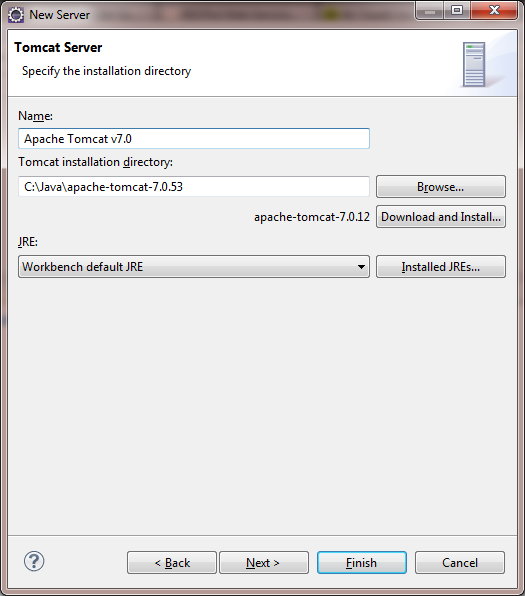
Apache altından Tomcat v7.0 Server seçip bir isim verelim. Sonraki sayfada da daha önce indirmiş olduğumuz Apache Tomcat’in yolunu gösterelim:
Sonraki ekranda ise var olan, deploy edilebilir projelerin listesini göreceğiz. Herhangi bir değişiklik yapmadan süreci tamamlayalım:

Artık Eclipse ile tanıştırmış olduğumuz bir adet Apache Tomcat server’ımız hazır. Bir hata yoksa ‘Servers’ penceresinde de görünür olmalı. Artık projeyi test etmenin zamanı.
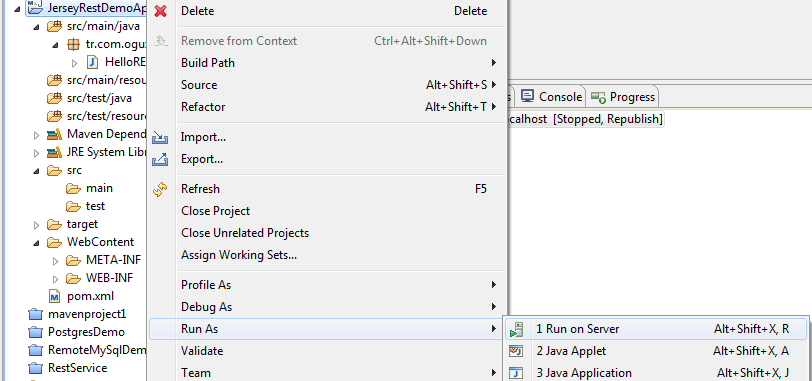
Proje üzerinde sağ tık -> Run As -> Run on Server seçenekleri ile projeyi çalıştıralım:
Eğer her şey yolunda gittiyse server başlamış ve artık RESTful servisimiz erişilebilir olmuştur. Bu durumda aşağıdakine benzer bir console çıktısı görmeliyiz:
May 01, 2014 4:30:09 PM org.apache.catalina.core.AprLifecycleListener init
INFO: The APR based Apache Tomcat Native library which allows optimal performance in production environments was not found on the java.library.path: C:\Program Files\Java\jdk1.7.0_55\bin;C:\Windows\Sun\Java\bin;C:\Windows\system32;C:\Windows;C:\Windows\system32;C:\Windows;C:\Windows\System32\Wbem;C:\Windows\System32\WindowsPowerShell\v1.0\;C:\Program Files\Dell\Dell Wireless WLAN Card;C:\Program Files (x86)\ATI Technologies\ATI.ACE\Core-Static;C:\Program Files\Java\jdk1.7.0_55\bin;C:\Java\play-2.1.3;C:\Program Files (x86)\VisualSVN Server\bin;C:\Program Files\Microsoft\Web Platform Installer\;C:\Program Files (x86)\Microsoft ASP.NET\ASP.NET Web Pages\v1.0\;C:\Program Files (x86)\Windows Kits\8.0\Windows Performance Toolkit\;C:\Program Files\Microsoft SQL Server\110\Tools\Binn\;C:\Java\android-64\sdk\platform-tools;C:\Java\android-64\sdk\build-tools;C:\Java\android-64\sdk\tools;C:\Program Files\Java\jdk1.7.0_55;C:\Java\apache-maven-3.1.1\bin;C:\Java\apache-maven-3.1.1\bin;C:\OpenCV\opencv2.4.8\build\x64\vc11\bin;.
May 01, 2014 4:30:09 PM org.apache.tomcat.util.digester.SetPropertiesRule begin
WARNING: [SetPropertiesRule]{Server/Service/Engine/Host/Context} Setting property 'source' to 'org.eclipse.jst.jee.server:JerseyRestDemoApp' did not find a matching property.
May 01, 2014 4:30:09 PM org.apache.coyote.AbstractProtocol init
INFO: Initializing ProtocolHandler ["http-bio-8080"]
May 01, 2014 4:30:09 PM org.apache.coyote.AbstractProtocol init
INFO: Initializing ProtocolHandler ["ajp-bio-8009"]
May 01, 2014 4:30:09 PM org.apache.catalina.startup.Catalina load
INFO: Initialization processed in 779 ms
May 01, 2014 4:30:09 PM org.apache.catalina.core.StandardService startInternal
INFO: Starting service Catalina
May 01, 2014 4:30:09 PM org.apache.catalina.core.StandardEngine startInternal
INFO: Starting Servlet Engine: Apache Tomcat/7.0.53
May 01, 2014 4:30:11 PM org.apache.catalina.util.SessionIdGenerator createSecureRandom
INFO: Creation of SecureRandom instance for session ID generation using [SHA1PRNG] took [129] milliseconds.
May 01, 2014 4:30:12 PM org.glassfish.jersey.server.ApplicationHandler initialize
INFO: Initiating Jersey application, version Jersey: 2.7 2014-03-12 18:11:31...
May 01, 2014 4:30:12 PM org.apache.coyote.AbstractProtocol start
INFO: Starting ProtocolHandler ["http-bio-8080"]
May 01, 2014 4:30:12 PM org.apache.coyote.AbstractProtocol start
INFO: Starting ProtocolHandler ["ajp-bio-8009"]
May 01, 2014 4:30:12 PM org.apache.catalina.startup.Catalina start
INFO: Server startup in 2983 ms
Yazı renginin kırmızı olduğuna bakıp da telaş yapmanıza gerek yok, her şey yolunda aslında. Bu arada tüm PATH değerini de public etmiş olduk :P
Test için browser adres satırına şunu yazdığımda:
http://localhost:8080/JerseyRestDemoApp/rest/helloREST/Oguz?value=test message
şu yanıtı aldım:
Greetings from Oguz : test message
Firefox için RESTClient eklentisi (https://addons.mozilla.org/en-US/firefox/addon/restclient/) ile test ettiğimde ise ekran görüntüsü aşağıdaki gibi oldu:

Hello world servisimiz hazır. Bundan sonra yeni metodlar eklemek mümkün. GET, POST, UPDATE, DELETE…
Proje dosyalarına GitHub üzerinden ulaşabilirsiniz -> https://github.com/OguzOzkeroglu/JerseyRestDemoApp
20 ekran görüntüsü ile muhtemelen bugüne kadarki en görsel yazımın sonuna geldik. Umarım yazıda işe yarar şeyler bulabilmişsinizdir.
Yorum yazın